Upgrading your SAP S/4HANA system can be a daunting task full of complex planning, tedious coordination, and potential pitfalls. But it doesn’t have to be! SAP’s new Release Upgrade Management tool is a game-changer designed to simplify and streamline the entire upgrade journey.
This innovative solution will save you time, reduce errors, and take the stress out of system upgrades with efficient planning, task automation, enhanced visibility, and accessible upgrade histories.
In this comprehensive guide, we’ll walk you through the key features of this powerful tool including step-by-step instructions for creating projects, selecting system landscapes, generating timelines, managing tasks, and more. Whether you’re a seasoned SAP veteran or tackling your first upgrade, Release Upgrade Management 1.0 will empower you to effortlessly orchestrate a smooth transition to the latest S/4HANA release.
Table of Contents
Let’s explore how this tool can help you plan, coordinate, and execute a flawless upgrade experience.
Getting Started with Release Upgrade Management Tool
The tool is available Free of charge for all RISE With SAP customers. To access the tool, simply log into SAP for Me and navigate to the ECS Workspace.
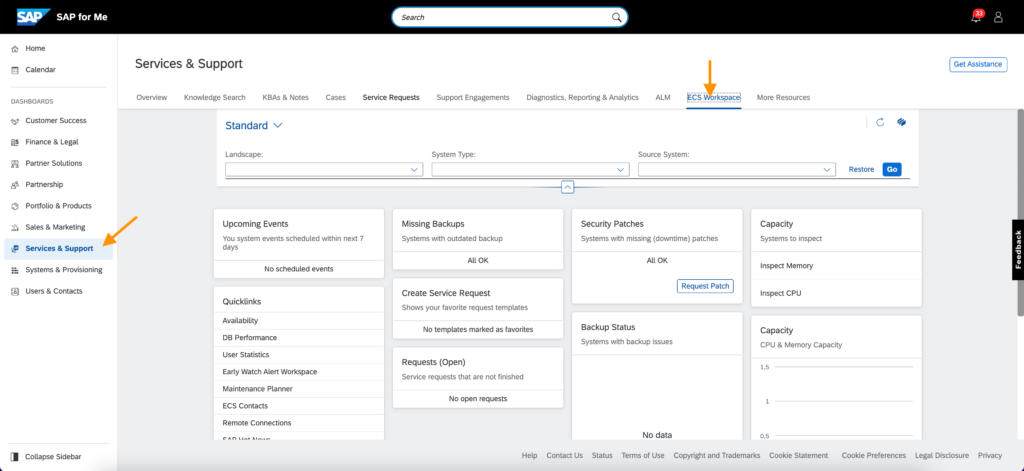
Locate and open the Release Upgrade Management app card to begin. The landing page will display any existing projects or be empty if you’re accessing it for the first time.
Click “Create” to start planning your upgrade journey. Provide basic project details like name and contacts. Assign at least one project manager before proceeding. You can also manage contacts directly from this section.
With the basic information in place, you’re ready to leverage the robust features of this tool to map out your upgrade seamlessly.
Selecting Your System Landscape
A critical next step is choosing the system landscape for your upgrade project. This configures the structure of your plan.
First, specify the desired upgrade target, such as SAP S/4HANA Cloud 2203. Then select your landscape type based on the number of tiers like development(DEV), test(QA), and production(PRD). More advanced options like hotfix and sandbox systems are also available.
You’ll then define the specific SIDs for your landscape. The tool retrieves database(DB) information to provide insights into your systems’ current state. Connected agents like app servers and web dispatchers are also configured individually.
The system selection process ensures all relevant components are captured to generate a comprehensive upgrade plan. Save your choices before moving to the next stage.
Reviewing Upgrade Targets and Timelines
With your landscape defined, the tool automatically calculates appropriate upgrade targets for each system and agent. You can easily compare source and target releases to identify required actions.
Next, pick a production go-live date and generate a high-level timeline. The tool produces a clear roadmap with major tasks and milestones tailored to your environment. You can recalculate or refine the timeline as needed.
Carefully review all entries on the summary page before submitting your project. Scope changes won’t be possible after submission, so validate thoroughly.
Managing Tasks and Tracking Progress
Now it’s time to create and assign service requests for the calculated tasks. Templates are provided to streamline this process. Align requests with the recommended timeframes for smooth execution.
Link the requests to corresponding tasks to enable tracking. Update progress by marking tasks complete as you move through project execution. Add comments or notes for your team if desired.
The tool shows real-time progress so you can monitor completion status. If issues arise, projects can be marked discontinued and resumed later.
Completing Your Upgrade Project
Once all activities reach completion, simply mark the project as finished. This action cannot be reversed, so only perform it when totally complete.
By leveraging the robust planning, coordination, and tracking capabilities of Release Upgrade Management tool, you can orchestrate an organized, efficient SAP S/4HANA upgrade from start to finish. Let’s recap some of the key benefits:
- Simplified End-to-End Planning: The tool guides you through the complex, multi-step planning process required for a successful upgrade.
- Enhanced Visibility: It provides real-time insights into task status, timelines, and system details to improve coordination.
- Automation: Manual, repetitive tasks like timeline generation and service request creation are automated to save time.
- Accessible History: You can look back on past upgrade projects to make informed decisions for future planning.
- Flexibility: Projects can be paused, restarted, or modified to accommodate changing needs and address issues.
Limitations
The tool is currently only enabled for RISE with SAP customers managed by Private Cloud Customer Center (PC3) and only applicable to release upgrades of SAP S/4HANA Cloud, private edition.
Conclusion
By removing the headaches traditionally associated with SAP S/4HANA upgrades, Release Upgrade Management tool enables you to upgrade with confidence. Simplify your next transition with this invaluable tool!
If you are a RISE With SAP customer, reach out to SAP_ECS_RUM_tool@sap.com, if you have any other questions as you get started.
FAQs
Below is the list of frequently asked questions on SAP S/4HANA Release Upgrade Management Tool.
What is the purpose of the Release Upgrade Management 1.0 tool?
The Release Upgrade Management 1.0 tool is designed to simplify the planning and coordination of system upgrades and updates for SAP customers. It provides an end-to-end solution to streamline the upgrade process.
What are some key benefits of using the Release Upgrade Management tool?
Key benefits include efficient planning, automation of manual tasks, enhanced visibility across teams, and accessible upgrade history for informed decision making.
What is the scope of the tool – what does it cover vs not cover?
The tool covers end-to-end planning and coordination of the upgrade project. However, it does not execute the actual technical upgrade/update process. Execution of upgrades and pre/post-upgrade tasks are outside the scope.
What are the key steps involved in using the tool for a new project?
Main steps are – create a project, select system landscape, specify upgrade targets, generate timeline, create service requests, track tasks, and mark project completion.
How do I add contacts to my project in the tool?
You can add contacts by clicking “Add Contact” in the Project Information step. Contacts can also be maintained in the “Manage Contacts” section accessible from the project view page.
Why is specifying the correct landscape type important?
The landscape type defines system roles and order of upgrades. It ensures proper organization and coordination between different systems in the upgrade process.
How does the tool generate the high-level timeline?
The timeline is generated based on the project go-live date and considers the selected systems, required actions, durations of key tasks/milestones.
What are Service Requests and how do I create them?
Service Requests are required to execute the actual upgrades. They are created by clicking “Create” next to the relevant tasks. SRs need to be linked back to the tasks.
How do I update the status of tasks during project execution?
Once preparation is completed, you can edit tasks to update status and add notes. The overall progress is shown in the Task Progress section.
When and how do I mark a project as completed in the tool?
After all execution is done, the project can be marked completed using the “Complete Project” button on the project view page.
Additional Resources
For more information on Release Upgrade Management tool, check the following resources:


